Khubani ka meetha with rabri (apricot delight)

Khubani ka meetha with rabri (apricot delight)

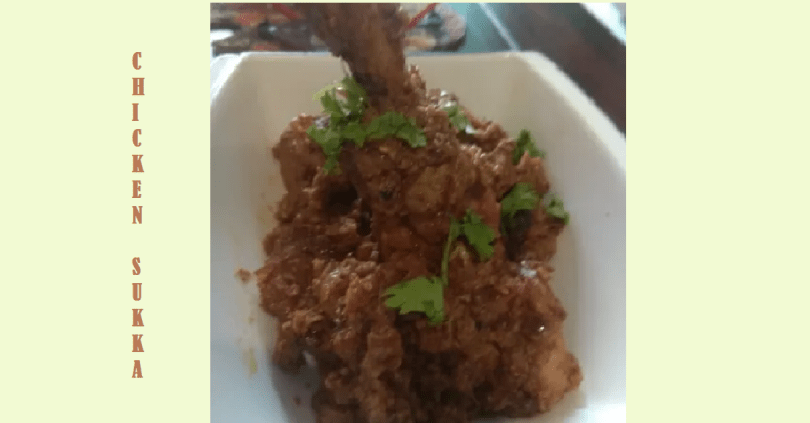
Khubani or apricot sweet is a classic Hyderabadi dessert that tastes amazing when topped with lusciously creamy rabri making it a purely delightful sweet. I had recently bought a packet of Apricot and used it just a couple of times while the rest lay unnoticed in my fridge. Yesterday while organizing it , the packet caught my attention and therefore came up  With this awesome recipe. I served it along with rabri and chopped nuts and this sweet and tangy dessert was an instant hit. Simple and easy to prepare, this Indian traditional sweet recipe is a must try where the apricot is slow cooked to jam -like consistency.

Ingredients

Apricot : 8 to 10 

Sugar : 4 tsp

Kesar : 7 to 8 strand

Rose water : 1 tsp

For rabri

Full cream milk : 1 litre

Sugar : 2 tsp

Dry fruits : 1 tsp

Step 1

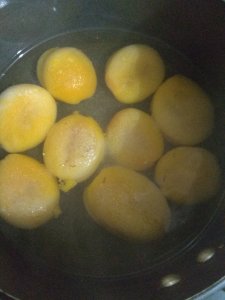
Soak the apricot overnight with enough water.

Step 2

After soaking it overnight,the apricot will become soft and double in size.

Step 3

In a thick bottom pan cook the apricot in the same soaked water on medium flame for 15 to 20 minutes.

Step 4

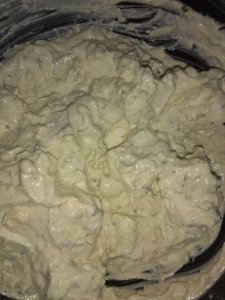
Once soft, mash the apricot with the help of a masher but also keep a few pulpy ones. Next add the sugar.

Step 5

Cook it for another fifteen minutes with the saffron. Finally add the rose water and give it all a good mix.

Step 6

Make rabri by reducing milk and sugar to the desired consistency.

Step 7

Serve the khubani ka meetha with rabri and garnish with dry fruits.

Tip

Use the same soaked water to cook the apricot. 

Adjust the sweetness as per your taste.

Chicken Sukka

Chicken sukka is a Maharashtrian style dry chicken recipe that is a treat for spice loving people. In my growing up years the one and only recipe we knew about with coconut was the nariyal barfi. It was only after I moved to Mumbai that I realised that coconut was one of the key ingredients for the base of any gravy and now I enjoy exploring new recipes with this incredible ingredient. Coconut not only gives texture to a dish but also adds nutty flavour to it. Chicken sukka is cooked with aromatic spices along with coconut that gives it a distinct flavour. It is a semi dry dish that can be served both as a starter or even as a main course.

Ingredients

Chicken : 500 gms

Ginger garlic paste : 2 tsp

Onion : 2

Turmeric powder : 1 tsp

Oil : 2 tsp

Salt as per taste

For the wet masala

coconut : ½ cup

Red chilli : 6

Coriander seed : 2 tsp

Cumin seed : 2 tsp

Peppercorns : 6

Cinnamon : 1

Clove : 2

Green cardamom : 2

Black cardamom : 1

Sesame seeds : 1 tsp

Poppy seed : 1 tsp

Step 1

Dry roast all the above mentioned ingredients except the dry coconut . Once done, let it cool.

Step 2

In the same pan dry roast the grated coconut until it releases the aroma.

Step 3

Grind the coconut and roasted masala into a paste.

Step 4

Marinate the chicken with ginger garlic paste, turmeric powder, salt and a tsp of ground masala. Keep it aside for at Least half an hour.

Step 5

Heat oil in a wok and add the sliced onion. Fry until golden brown.

Step 6

Add the marinated chicken and cook on a high heat for 8 to 10 minutes stirring occasionally.

Step 7


Add a cup of water and let it come to a boil. Next, put the ground masala and give them all a good mix. Cover and let it cook on medium flame for about 20 minutes stirring occasionally.

Step 8

Once the chicken is tender and moisture evaporates and you get desired consistency, it is done.

Step 9

Garnish and enjoy the chicken sukka with any Indian bread of your choice.

Tip

Dry coconut gives an authentic flavour to the chicken sukka

Paneer Pasanda

Gauri, a close pal of mine, is the Only vegetarian friend in the close circle of my friends. For an ardent meat lover it becomes a herculean task to to lay out an equally exotic and impressive vegetarian spread for a loved one. So this time when we decided to meet over dinner, I tried my hand on the delectable paneer pasanda for the very first time and to my surprise it turned out to be good enough to eat. Paneer slices sandwiched with dry fruits and served in tomato gravy, paneer pasanda is a must try dish. Serve it with lachcha paratha since they compliment each other really well. This dish involves extensive preparation and could be made for special occasions.

Ingredients

Paneer : 250 gms

Onion : 1

Tomato : 3

Cashew nut : 8 to 10 pieces

Ginger garlic paste : 2 tsp

Kasuri methi : 1 tsp

Red chilli powder : 2 tsp

Turmeric powder : ¼ tsp

Salt as required

Oil for frying

Cornflour : 4 tsp

Butter : 2 tsp

For stuffing

Green chilli coriander chutney : 1 tsp

Cashew nut : 2

Cheese : grated 2 tsp

Apricot : diced 2 tsp

Step 1

Cut a thick slice of paneer into two pieces with the thickness of half inch.

Step 2


Mix together the grated cheese, apricot, green chilli coriander chutney and diced cashews .

Step 3

Place a spoon full of stuffing on a paneer slice and top with the other slice. Repeat the same with the rest of the paneer .

Step 4

Dip in a cornflour slurry.

Step 5


Carefully fry the sandwiched paneer from both the sides.

Once done take it out in an absorbent paper.

Step 6

In a pan heat 2 tsp of butter and saute onion for a couple of minutes. Add cashew nut, sliced tomatoes and kasuri methi and fry them together for another three to four minutes. Next add half a cup of water and allow to cook for about ten minutes on medium heat.

Step 7

Let it cool down and grind into a smooth paste. Heat two tsp oil in a pan and add ginger garlic paste. Saute it and then add the ground paste along with red chilli powder, turmeric powder and salt. Cook them all together until the oil leaves the side of the pan. Add a cup of water and let it come to a boil.

Step 8

Gently place the paneer pasanda on the gravy and let it come to one boil. 

Step 9

Top it with cream and serve the pasanda with paratha or naan.

Tip

Apricot gives a sweet kick to the stuffing. You can even substitute it with raisins.


Pomfret fry

White pomfret is known for its amazing taste that is full of flavour and a perfect side dish for any meal. The fish is marinated with a spicy paste and eventually coated with semolina and  fried to perfection. Indeed pomfret or paplet fry in the local dialect is extremely popular in the coastal belt of Maharashtra region. My family simply loves it because of its melt in mouth texture with crispy and crunchy crust. At the end of the day what matters most to me is to see my loved ones relishing the dish together. Try this incredible dish to experience the smile of your dear ones.

Ingredients

Pomfret fish : 4

Ginger paste : 2 tsp

Garlic paste : 1 tsp

Red chilli powder : 2 tsp

Coriander powder : 2 tsp

Turmeric powder : 1 tsp

Lemon juice : 1 tsp

Rice Flour : 100 gms

Semolina : 100 gms

Salt as required

Oil for frying

Step 1

Wash the fish and make slits on both sides.

Marinate the fish with ¼ tsp salt and lemon juice and leave it aside for at least 15 minutes.

Step 2


In a bowl mix together the above mentioned masala. 

Step 3

apply it to the fish and make sure to put inside the slit.

Step 4

In a separate plate mix together rice flour, rava along with a pinch of salt.

Step 5

Coat the marinated fish with the rice flour and rava mix.

Step 6

Pat the excess flour from the fish. In a thick bottom frying pan shallow fry the pomfret from each side until golden brown .

Step 7

Serve hot along with onion rings and lemon wedges.

Tip

Lemon juice and salt reduces the fishy smell of pomfret.

Arbi Tacos ( taroo root tacos)

Being grown up in a big joint family, we were not fussy eaters and relished everything that was served to us. But it is not so with today’s generation since most of them live in a nuclear family with options of eating as per their taste and choice. Nevertheless as a mother, I keep planning an interesting menu with the lesser known vegetables so that my boys could be familiar with their unusual taste as well. Arbi is one such vegetable that grows Underground and has a complex taste. Children dislike its taste because of its starchy texture. As such I tried a new recipe with arbi  and to my utter surprise the dish turned out to be so exotic that my boys could not relate to its original flavour and enjoyed it . Try the recipe as it is a perfect one for all the fussy eaters out there.

Ingredients

Arbi : 250 gms

Coriander powder : 1 tsp

Amchur powder : ¼ tsp

Red chilli powder : 1 tsp

Garam masala powder : ½ tsp

Rice flour : 1 tsp

Oil for frying 

Salt as per taste

For the filling

Cabbage : shredded 4 tsp

Onion : 2 thinly sliced

Cheese : 2 cubes

Lemon juice : 2 tsp

Mayo mix : mayonnaise, Tomato sauce and chilli sauce.

Leftover chapati

Step 1

Pressure cook arbi for three whistles or until soft.

Step 2

Once cool, peel and flatten it by pressing with the palm.

Step 3

In a bowl mix together rice flour, turmeric powder, red chilli powder, amchur and Salt.

Step 4

Roll the flattened arbi into the masala mix and shallow fry them until golden brown.

Step 5

Roll out the half cooked lachha paratha or the leftover roti.

Step 6

Evenly spread the mayo mix on the roti and place the fried arbi over it. Finally place the shredded  cabbage, sliced onion and cheese over it along with lemon juice and a dash of salt.

Step 7

Fold the roti into half like a taco.

Step 8

Gently place it on a frying pan and add a tsp of oil.  Press with the spatula and cook on a low heat until it is crispy. Flip over gently and repeat the process on the other side.

Step 9

Serve hot.

Tip

Rice flour adds crunch to the fritter.


Kothambir vadi ( cilantro fritters)

Kothambir vadi ( cilantro fritters)

Coriander is a very commonly consumed herb that is often used in traditional Indian food. It is exclusively used as a garnish to make the food presentable and palatable. During my growing up days we often relished the coriander chutney as an accomplishment along with the staple rice and dal during the winter season. It was only during my stay in Mumbai that I came across a new term Kothimbir or kothmir, the word used for coriander leaves in Maharashtra and the vada or the fritters made from it is a highly popular and simple Maharashtrian snack recipe . Little did I imagine that the humble dhaniya patta could be transformed into such a mind blowing delicacy. Basanti, my house help makes amazing kothimbir vadi and I am sharing her recipe with my readers. It is made using coriander leaves, gram flour and few other regularly used Indian spices. Soft from inside while crunchy and crisp outside makes it a perfect tea time snack.

Ingredients

Kothimbir : 2 bunches

Besan : 1 cup

Rice flour : ½ cup

Green chillies : 6 to 8

Garlic pod : 8

Turmeric powder : 1 tsp

Asafoetida : a pinch

Ajwain : ¼ tsp

Salt as per taste

Oil for frying

Step 1

Wash the coriander leaves and squeeze the excess water. Next finely chop and put it in a bowl. In the meantime grind the green chillies and garlic into a smooth paste.

Step 2

Add the besan, rice flour, green chilli and garlic paste, turmeric powder, ajwain, hing, salt and a tsp of oil.

Step 3

Add water and knead a tight dough. 

Step 4

In a steamer add 2 glasses of water and steam the rolled dough for 15 to 20 minutes on a medium flame. Insert a knife and if it comes out clean, the dough is done and if not then steam it further for another 7 to 10 minutes.

Step 5

Remove it from the steamer and let it cool down. Once it comes to the room temperature cut it into small pieces.

Step 6

Shallow fry the vada in a medium hot oil until they are golden brown.

Step 7

Serve the kothimbir vadi with chutney of your choice.

Tip

Rice flour adds the extra crunch to the vadi.

Chicken Vada Pav

Mumbai and it’s passion and love affair with vada pav is well known. This mouth watering snack enjoys immense popularity among the Mumbaikars and my boys are no different and especially the younger one. Recently on his visit to a food joint, he came across the non vegetarian version of this iconic snack called ” chicken vada pav”. Mesmerised by its aroma and flavor, he motivated me to give a try to this unique dish. Chicken keema cooked with regular spices and herbs, stuffed in the potato mix, dipped in gram flour batter and deep fried to perfection and finally sandwiched between the pav — an iconic dish with an iconic twist.Believe me, the explosion of flavours is worth all the hard work.

Ingredients 

For keema

Chicken mince : 200 gms

 Onion : 1

Ginger garlic paste : 1 tsp

Corriander powder : 2 tsp

Red chilli powder : 1 tsp

Turmeric powder : 1 tsp

Cinnamon stick : 1

Black cardamom : 1 

Green cardamom : 1

Lemon juice : 1 tsp

Salt as per taste

Green peas : 2 tsp

For potato mix

Potato : 4 boiled and mashed

Green chili : 4 to 6

Garlic : 6 to 7 pod

Turmeric powder : ½ tsp

Mustard seed : ½ tsp

Curry leaves

Salt

For the batter

Besan : 6 spoon

Ajwain : ½ tsp

Red chilli powder : 1 tsp

Salt as per taste

Oil for frying

Step 1

Take two tsp oil in a pan and add cinnamon, cardamom and cumin seed and let it splutter. Add the chopped onion and fry until golden brown.

Step 2

Add the ginger garlic paste, coriander powder, red chilli powder and salt and saute until the masalas are cooked. Next add the chicken mince and give them all a good mix. Put the peas and saute them all together.cover it with a lid and let it cook for ten to fifteen minutes until the keema is done stirring regularly.

Step 3

Sprinkle coriander leaves and add the lemon juice. Keep it aside and let it cool.

Step 4

In the meantime make a lump free and smooth thick batter with besan, salt, chilli powder and turmeric and water. Let it rest for sometime.

Step 5

In a pan heat 1 tsp oil and fry the green chillies and garlic. Once cool coursley grind it. 

Step 6

In the same pan add two tsp oil and add the mustard seeds and curry leaves and let it splutter and release the aroma. Next add the boiled and mashed potatoes along with turmeric and red chilli powder and salt and stir fry them until done. Let it cool.

Step 7

Grease your palm and make a ball with the potato mix and fill in two tsp keema in the centre and give it a shape like a round shaped vada.

Step 8

Dip the vada in the besan batter and deep fry and enjoy with pav and chutney.

Tip

One may use the soya keema for the veg version.


Keema goli ( mutton ball)

Keema goli or mutton ball is yet another favourite recipe from our growing up years. As kids we loved this recipe since it was easy to munch and full of flavours. The delicious and crunchy mutton Keema goli is a must try dish for meat lovers. It is indeed a great combination of incredible spices along with mutton cooked to perfection. Though it does not enjoy popularity like Shammi kebab or gelauti kebab but it is a great recipe to indulge as a snack or even for the main course along with the main spread.

Ingredients

Mutton mince : 250 grams

Chana dal : 2 tsp (washed and soaked for at least half an hour)

Onion : 1 small

Ginger : 1 inch

Garlic : 4 to 6 pod

Whole red chilli : 4 to 5

Corriander seed : 1 tsp

Cumin : ½ tsp

Black cardamom : 2

Green cardamom : 2

Pepper corn : 6

Cinnamon stick : 1

Raisin : 8 to 10

Bread crumbs : 2 tsp

Salt : as per taste

Oil for frying

Step 1

Wash the mutton Keema thoroughly.

Step 2

In a pressure cooker put the Keema long with sliced onion, Ginger, garlic, corriander seed, cumin, clove, pepper corn,cardamom, cinnamon stick,salt and half a cup of water 

Step 3

Cook it for 3 to 4 whistle. Once the pressure is released, check the excess water and in case it’s there cook it on a high flame until the  water completely evaporates.

Step 4

Let it come down to the room temperature .

Step 5

Grind it in a mixie with one tsp oil. Add two tsp of bread crumbs to the keema mixture.

Make small Keema balls and stuff a raisin in the centre.

Step 6

Deep fry the goli until golden brown. Serve it with chutney of your choice .

Tip

The raisin in the centre helps the goli to remain soft inside and also gives a sweet flavour to it.


Soya Mughlai Paratha

Paratha is a staple Indian food and especially in Northern part of India, a day is incomplete without their very own paratha.From plain to stuffed, it is enjoyed in any form. Mughlai paratha is a popular Bengali street food and I have tried a veg version of it with soya granules. With 52% protein content, it is indeed a powerhouse recipe for your dear ones. combine it with your favorite chutney and relish the divine flavour of soya keema mughlai paratha.

Ingredients

For the dough

Maida: 250 gms

Oil: 2 tsp

Salt: 1 tsp

For the stuffing

Soya keema: 200 gms

Onion: 2

Green chilli: 6 to 7

Garlic paste: 1 tsp

Coriander powder: 2 tsp

Turmeric powder: 1 tsp

Green peas: 50 gms

Garam masala powder: 1 tsp

Lemon juice: 2 tsp

Kasuri methi: 1 tsp

Salt : as per taste

Oil : for frying

Step 1

img_20190613_1844201007716838.jpg
Step 1: Soya Mughlai Paratha

Soak the soya keema in hot water along with salt. Drain it out after 5 to 7 minutes or until they become soft. Once cool squeeze the extra water from it and keep it aside.

Step 2

img_20190613_1924171963513952.jpg
Step 2 : Soya Mughlai Paratha

Knead maida along with oil and salt. Cover it with a damp cloth and let it rest for at least half an hour.

Step 3

img_20190613_1840281704696530.jpg
Step 3: Soya Mughlai Paratha

Add onion in a hot oil and Fry them until done. Add the rest of the masala and saute it until the oil leaves the side of the pan.

Step 4

img_20190613_1841321688718795.jpg
Step 4 : Soya Mughlai Paratha


Now put the peas and saute it along with the masala.


img_20190613_184524138770532.jpg
Step 5 : Soya Mughlai Paratha


Once the peas is coated with the masala add soya granules and let them cook together.

Step 6

img_20190613_185040728754516.jpg
Step 6 : Soya Mughlai Paratha


Once done sprinkle kasuri methi along with coriander leaf and lemon juice. Keep it aside and let it come to room temperature.

Step 7

img_20190613_1938301618474704.jpg
Step 7 : Soya Mughlai Paratha

Roll the dough into a thin rectangular sheet.

Step 8

img_20190613_193914836783657.jpg
Step 8 : Soya Mughlai Paratha

Place the filling in the centre of the sheet.


Step 9

img_20190613_193944990455054.jpg
Step 9:Soya mughlai paratha


Now fold the four sides of the sheet inward, starting with the longer side forming an envelope shape. Now press down gently and seal the sides.

Step 10

img_20190613_1942122124996967.jpg
Step 10 : Soya Mughlai Paratha

Heat oil in a frying pan and shallow Fry until golden brown and crispy.

Final Step

img_20190613_195647-11766710746.jpg
Food Ready : Soya Mughlai Paratha

Enjoy the soya mughlai paratha with chutney.

Tip

One can replace the soya keema with any other vegetable of your choice.

Paneer Malai Tikka ( Creamy Grilled Cottage Cheese)

Paneer malai tlkka is a succulent veg kebab marinated in yoghurt, cream along with other mild favoured spices. The name itself tells you what to expect from the dish —- melt in your mouth texture and delight to your palate. Since paneer malai tikka is less spicy recipe, it is especially relished by the kids. Infact this is my children’s one of the favourite veg recipe and have the tendency to eat an extra serving. It is a perfect dish for celebration and gathering and can be served as an appetiser, snack or main course along with naan, bread or roti.

Ingredients:

Paneer: 400gms

Hung curd: 100 GM’s

Grated cheese :4tsp

Cornflour: 2tsp

Cream: 6tsp

Chat masala: 1tsp

Green cardamom powder: a pinch

Kasuri methi: 1tsp

Mustard oil: 1tsp

Capsicum: 1 diced

Onion: 1 diced

Salt: as per taste

Butter: for brushing

For grinding:

Green chillies: 8 to 10

Ginger: 2 inches

Garlic: 8to10 cloves

Follow step by step instructions

Step 1:
img_20190318_173153-21532438926.jpg
Grind ginger, garlic and green chillies into a smooth paste.

Step 2:
img_20190318_173750-2939034981.jpg
In a bowl mix Hung curd, cheese, cream, ginger, garlic and green chilli paste, kasuri methi, chat masala, green cardamom powder, cornflour and salt.

Step 3:
img_20190318_173935-2508695360.jpg
Whisk it all together and add a Tsp of Mustard oil into it.

Step 4:
img_20190318_174248-2955152512.jpg
Add the paneer pieces and gently mix them with the help of a spatula. Let it marinate for at least an hour.

Step 5:
img_20190318_174954-21499199253.jpg
Arrange it in a skewer or tooth pick along with capsicum and onion.

                  Or
img_20190318_180127-2379824689.jpg
Grill the paneer tikka in the air fryer

and air-fry for 10 to 12 minutes at 200 degree celcius. Once half done brush with butter and cook it further till done.

Step 6:
img_20190318_183336-21474130126.jpg
Serve it along with salad of your choice.

Tip:

Mustard oil gives the pungent aroma to the kebab