Mutton Turk kebab मटन तुर्क कबाब

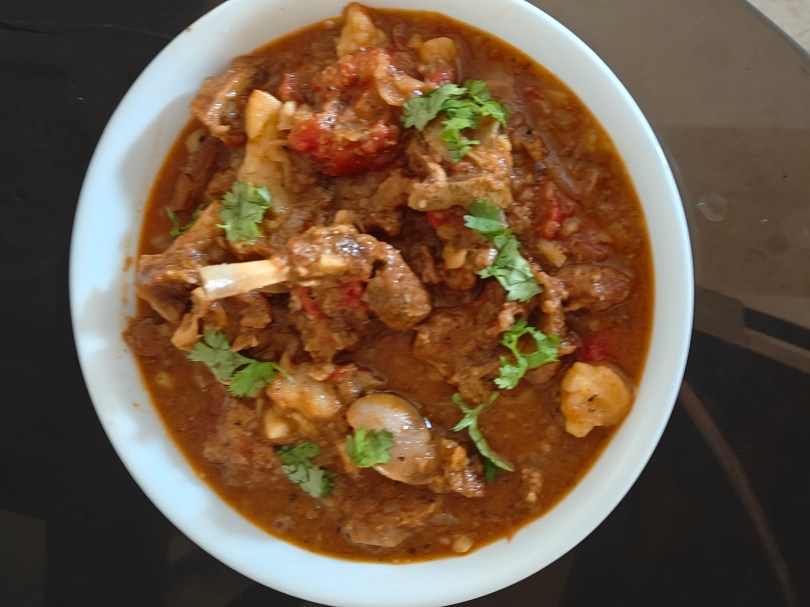
Recipes are not just instructions to prepare a meal , they are indeed memories that are kept alive through practice. Mutton Turk kebab is yet another amazing recipe from my family’s culinary treasure. The taste and aroma of the dish evokes  vivid memories of childhood kitchen. It is a simple recipe of slow cooked mutton along with layers of onion, potato and tomato roundels. My blog provides me a platform to share my incredible family recipes with my readers and believe me this gives me immense  satisfaction and happiness.

Serving for 4 to 5 persons

Mutton : 1 kg

Onion : 750 gms

Potato : 4 large boiled

Tomato : 3 to 4 large

Ginger garlic paste : 2 tsp

Turmeric powder : 1 tsp

Red chili powder : 1 tsp

Coarsely ground black pepper : 2 tsp

Garam masala powder : 1 tsp

Curd : 2 tsp

Ghee : 2 tsp

Mustard oil : 4 tsp

Bay leaves : 6

Salt to taste

Step 1


Wash the mutton pieces thoroughly and drain the excess water. Marinate with 2 tsp mustard oil, ginger garlic paste, turmeric powder, red chili powder, pepper, curd and salt.

Step 2


Slice onion, boiled potato and tomato into roundels.

Step 3


Heat the remaining oil in a thick bottom pan. Once medium hot, place the bay leaves in the base of the pan.

Step 4


Evenly spread half the quantity of the marinated mutton in the first layer.

Step 5


Place a layer of onion roundels in the second layer followed by another layer of potato and next with the tomato. Repeat the same process with the remaining mutton. Once done with the second layer of mutton, tomato, onion and potato , add 2 tsp of ghee and kashmiri red chili powder on the top of the final layer.

Step 6


Seal the utensils and cook on the dum on low heat for an hour and half. Do not stir, instead wave the pan from side to side at regular intervals in order to prevent it from burning.

Step 7

Switch off the flame and leave it for another 15 to 20 minutes. Serve the Turk kebab along with any Indian bread of your choice.

Mutton Turk kebab is yet another amazing recipe from Nandini’s family culinary treasure


Tip 

The layering with onion, potato and tomato results in a perfect consistency of gravy.

Use chilled boiled potatoes for a perfect result.

Chicken Cutlet

Delicious, juicy and crispy chicken cutlet is  a fried patty that is served as a starter or even main course. This amazing recipe is from my mom’s kitchen that I have been enjoying since my childhood days. The love for the dish has graciously passed on to the generation next and my boys too love this scrumptious home made Indian style chicken cutlet. Quite often I make and store it in the freezer so that my son’s can have it whenever they wish. I have just used boneless chicken and a few regular spices available in any Indian household. My family relishes cutlets along with garlic bread but believe me it tastes amazing even with rotis and parathas.

Ingredients

Boneless chicken : 500 gms

Onion : 2

Ginger garlic paste : 1 tsp

Green chili : 4 to 5

Lemon juice : 1 tsp

Coriander leaves : 2 tsp

Mint leaves : 10 to 12

Black pepper : 1 tsp

Garam masala powder : ¼ tsp

Flour : 4 tsp

Bread crumbs : for coating

Oil for frying

Salt to taste.

Step 1

Wash the chicken pieces and pat them dry.

Step 2 

Grind into a semi smooth paste.

Step 3

Heat a tsp of oil in a pan. Add onion and saute for a couple of minutes. To this add the sliced green chili, ginger garlic paste, pepper, mint and coriander leaves, garam masala and salt. Cook them all together for about 2 to 3 minutes and then switch off the flame.

Step 4

Pour the onion mixture on the minced chicken. Add the lemon juice and mix it well until they all come together. Add a soaked and drained bread to it so that it works as a binding agent.

Step 5

Grease your palm and make equal sized balls. Next press and give the cutlets the desired shape.

Step 6

Mix the maida and water to make a slurry. In a separate plate spread the bread crumbs. First dip the cutlet in the slurry and the roll it in the breadcrumbs to evenly coat the cutlets.

Step 7

Heat oil in the frying pan and fry the cutlets until crisp and golden brown. Once done take them out in an absorbent paper.
Serve hot with sauce or mayonnaise of your choice.

Tip

Add a tsp of oil while grinding the chicken as it will help the cutlets to remain moist.

Korean Egg Roll

“Sunday ho ya Monday, Roz Khao andey  ( संडे-हो-या-मंडे-रोज-खाओ-अंडे )” and when you get bored of the repeated preparation opt for a new one. I just love including eggs in my recipe as there is something so satisfying about when they are perfectly cooked. I came across the recipe recently and thought of trying my hand on it and luckily I nailed it in my first try. There are many different variations of  omelet but believe me this will make you fall in love with it. A new spin to the traditional omelet is indeed a must try dish.

Ingredients

Egg : 4

Grated carrot : 2 tsp

Coriander leaves : 1 tsp

Thinly sliced green chili : 1

Salt as required

Oil or butter : 1 tsp

Step 1

Separate the yolk and egg white.

Step 2

Add the grated carrot, coriander leaves, green chilli and salt to the egg white and lightly whisk with the help of a fork. Add a tsp of water to the egg yolk along with a pinch of salt and mix it .

Step 3

Take a thick bottom pan and brush with butter or oil.

Step 4


Once hot, reduce the flame and pour a thin layer of egg white and spread evenly.

Step 5

Once it starts to cook, gently fold it.

Step 6

With the help of a spatula, lift the edge of the cooked egg and pour the remaining egg white and let it cook.

Step 7

Repeat the process with the remaining egg white.

Step 8

With the help of a spatula gently lift the cooked egg and pour a thin layer of yolk and spread evenly in the pan.

Step 9

Once done, roll it gently and add the remaining yolk. Gently press the spatula over it to give a nice square shape.

Step 10

Take it out on a chopper board.

Step 11


Slice them into roundels and enjoy it.

Tip

Use low heat 

To make the roll thicker, increase the amount of eggs.


Crispy Chicken Leg

Crispy chicken leg is an easy dish with a beautiful blend of flavours of tandoori as well as crunchiness of fried chicken. Home made tandoori chicken is my family’s all time favourite recipe. But this time my husband asked for a different variation of this classic recipe with a crispier crust. And I attempted this recipe that luckily turned out to be an awesome one  with moist inside and wonderfully crispy on outside. Serve it as a starter or side dish to enjoy the delightful variation of crispy chicken legs.

Ingredients

Chicken legs with thigh: 2 pieces

Lemon juice : 1 tsp

Beaten egg : 1

Milk : 1 tsp

Bread crumbs : to coat

Salt to taste

For the marination

Hung curd : 2 tsp

Ginger garlic paste : 1 tsp

Kashmiri red chilli powder : 2 tsp

Tandoori chicken masala : 1 tsp

Chat masala : 1 tsp

Cournflour : 1 tsp

Butter : 1 tsp

Mustard oil : 1 tsp

Salt as required

Step 1

Cut deep slashes in the chicken pieces. Clean and marinate with lemon juice and a tsp of salt. Let it rest for at least half an hour.

Step 2 

In a bowl mix together all the above mentioned ingredients for marination.

Step 3

Pat dry the chicken and marinate with the second marinade. Keep it aside for at least a couple of hours.

Step 4

Place it in a preheated air fryer and cook for about 15 minutes at 200 degree Celsius .

Step 5

Once tender, take it out.

Step 6

In a deep plate whisk egg, milk and salt. Dip the prepared tandoor legs in the egg dip.

Step 7

Next coat it evenly in the bread crumbs from both the sides.

Step 8

Heat a couple of spoons of oil in a frying pan and shallow fry the legs from both the sides until crispy and golden brown.

Step 9

Serve it along with sauteed vegetables and salad.

Tip

Whisked egg and milk helps the crumbs to stick to the chicken.

Low fat ( Zero Oil ) Chicken Popcorn

The zero oil small bite sized juicy chicken, breaded and baked to perfection, chicken popcorn is my boys all time favourite snack that they can munch on any time of the day. I usually half cook and freeze so that whenever they feel the craving of popping it, they can airfryer for a couple of minutes and enjoy it guilt free. This healthier version of the conventional chicken popcorn tastes amazing that can be equally relished by people of all ages.

Ingredients

Chicken breast : ½ kg

Ginger garlic paste : 2 tsp

Curd : 2 tsp

Schezwan sauce : 1 tsp

Red chilli sauce : 1 tsp

Tomato sauce : 2 tsp

Black pepper : 2 tsp

Salt as required

Bread crumbs : 100 gms

Step 1

Slice the chicken breast into bite sized pieces and wash thoroughly. Squeeze the excess water. Add ginger garlic paste, curd, tomato sauce, chilli sauce, Schezwan sauce, black pepper and salt. Mix well.

Step 2

Marinate and keep it aside for a couple of hours or overnight.

Step 3

Roll each piece in the bread crumbs.

Step 4

Place each one of them separately in the airfryer and brush with oil.

Step 5

Cook for about 10 to 12 minutes at 200 degree Celsius until the crust is crunchy and the chicken is tender.

Or

Shallow fry in a thick bottom pan.

Step 6

Enjoy the chicken popcorn with sauce or mayonnaise of your choice.

Tip

Bread crumb is one of the key ingredients and so use the best one.

Sprinkle your choice of seasoning to make it even more tastier.


Chicken Bacon Sandwich

One can never go wrong with a sandwich as it never fails to impress. Anubhav, my elder son, recently bought a packet of chicken bacon, providing me with a canvas to experiment with the culinary art. I have always enjoyed trying new and innovative recipes in my kitchen and this time it was no different and ended up making an awesome sandwich with stuffing of bacon, egg, onion and green chillies. Believe me it was amazing and my family just loved it. Do give a try to this power packed recipe.

Ingredients

Chicken bacon : 2 slice

Egg : 2

Whole wheat bread : 2 slice

Onion ring : 1

Green chilli : 1

Butter : 3 tsp

 Step 1

In a thick bottom pan add a tsp of butter and heat the bacon slice  for a minute flipping both the sides. 

Step 2

In the same pan saute the onion slice and green chilli for about a minute. Season with salt and pepper. 

Step 3

Beat the egg and add salt to it.

Step 4

Butter the bread slice on both sides.

Step 5

Heat butter in a pan. Dip the bread pieces in the whisked egg and gently place both the slices in the pan. Pour the remaining egg over the bread.

Step 6

Once golden brown gently flip and neatly fold the egg over the bread.

Step 7

Place the sauteed bacon, onion and green chillies evenly on the bread slices.

Step 8

Gently place the bread over the other slice and saute it for another couple of seconds.

Step 9


Enjoy the sandwich

Tip

Enhance the flavour with mayonnaise, fresh lettuce, tomatoes or any other stuffing of your choice.

 Rohu Matar ( Fish curry with Peas)

No matter how much you grow up and age, the childhood memory of your mom’s cooking is bound to have an influence on you and one could never match up to the same. And my story is no different with her being a great influence in my food journey. Her ability to cook the simplest food tastes best, something I look forward to inheriting from her. Rohu matar is my mom’s recipe, easy to make yet tastes amazing. A healthy recipe with the combination of seasonal vegetable and fish is a perfect treat for a winter brunch.

Ingredients

Rohu fish: ½ kg

Green peas : 100 gms

Onion : 2

Tomato : 1

Curd : 4 tsp

Coriander powder : 2 tsp

Turmeric powder : 1 tsp

Red chilli powder : 1 tsp

Ginger garlic paste : 2 tsp

Green chilli : 2

Mustard oil : for frying

Salt as per taste

Step 1

Grind onion and tomato into a smooth paste. In a bowl take a spoon full of water and add the ginger garlic paste, red chilli powder, turmeric powder and coriander powder and mix well to make a smooth paste.

Step 2

Marinate the fish with garlic paste, turmeric powder, red chilli powder, salt along with a tsp mustard oil and ground masala.

Step 3

Heat mustard oil in a pan and shallow fry the fish.

Step 4

Rohu matar is my mom’s recipe, easy to make yet tastes amazing. A healthy recipe with the combination of seasonal vegetable and fish is a perfect treat for a winter brunch.


Once done take it out in an absorbent paper.

Step 5

Heat oil in a pan and add the onion tomato paste along with prepared masala paste and saute until the oil leaves the side of the pan.

Step 6

Add the peas and cook it along with masala for about four to five minutes.

Step 7

Next add the curd and stir them all together for a couple of minutes.

Step 8

Add the required amount of water and let it come to a boil.

Step 9

Gradually add the fried fish into the gravy and cook on high flame for about five  minutes. Add the slit green chilli and switch off the gas.

Step 10

Garnish with coriander leaves and serve it along with steamed rice.

Tip

Fried cauliflower florets and peas is a match made in heaven that combines well with rohu.


Keema pav

Keema pav has gradually become an iconic street food of Mumbai that initially originated from the famous Mumbai’s Irani restaurant. Keema in any form has been my favourite childhood indulgence and my mom would often cook it for me. My love for keema has been genetically passed on to my foodie ” chota beta” who just loves it in any possible way. As a result my experiment with keema has always been an integral part of my culinary journey. Keema along with pav tastes absolutely amazing and is a combination to die for. It is normally cooked with mutton keema but I have tried with chicken keema and believe me it tastes equally amazing.

Ingredients 

Chicken keema : ½ kg

Onion : 2

Tomatoes : 2

Ginger garlic paste : 2 tsp

Coriander seed : 2 tsp

Turmeric powder : ½ tsp

Red chilli powder : 1 tsp

Garam masala powder : ½ tsp

Apricot paste : 1 tsp

Green chilli : 2

Cinnamon stick : 1

Cardamom : 1

Coriander leaves : 4 tsp

Salt as per taste

Oil : 3 tsp

Step 1

Wash the keema in a stainer.

Step 2

Grind together coriander seed, onion, cinnamon, cardamom, green chilli and coriander leaves.


Step 3

Heat oil in a pan and fry onion until golden brown. Add the diced tomatoes and saute them together until the tomatoes are soft.

Step 4

Add the ground masala along with ginger garlic paste, red chilli powder, turmeric powder and salt and saute until the oil leaves the side of the pan.

Step 5

Put the keema and combine it together with the rest of the masala.

Step 6

When the oil leaves the side, add apricot paste along with a cup of water and cook it for another ten minutes until the gravy reaches the desired consistency.

Step 7

Garnish with coriander leaves and lemon wedges and serve it along with pav.

Tip

The apricot paste adds a sweet and tangy flavour to the keema.

Minty Chicken Kebab

Getting back to what you are at best after a much needed break is like a breath of fresh air. In my recent travel spree, I got a chance to taste a few amazing dishes and so couldn’t stop myself from trying one such recipe of scrumptious kebab. It’s my take on the chicken kebab along with the refreshing flavour of mint and coriander topped with butter and cream dressing. The mildly flavoured Minty chicken kebab is worth a try.

Ingredients

Boneless chicken : ½ kg ( cut into medium sized cubes)

Hung curd : 4 tsp

Cream : 6 tsp

Mint leaves : ½ cup

Coriander leaves : ¼ cup

Green chilli : 6

Lemon juice : 1 tsp

Ginger garlic paste : 2 tsp

Kasuri methi : 1 tsp

Roasted besan : 2 tsp

Chat masala : 1 tsp

Garam masala : 1 tsp

Cinnamon powder : ¼ tsp

Mustard oil : 1 tsp

Butter : 50 gms

Salt as per taste

Step 1

Marinate the chicken with lemon juice and salt for about fifteen minutes.

Step 2

Grind together mint, coriander leaves and green chilli.Transfer it into a bowl and mix it together with four tsp of cream.

Step 3

In a separate bowl mix the other marinade consisting of ginger garlic paste, chat masala, salt, garam masala powder, kasuri methi, roasted besan and mustard oil.

Step 4 

Squeeze the excess water from the chicken pieces and marinate it with the second marinade. Keep it aside for half an hour.

Step 5

Lastly add the green chutney and cream mix and hung curd.let it rest for at least five to six hours.

Step 6

Thread it in the skewers and grill it for about 20 minutes at 160 degrees or place it in the airfryer for about fifteen minutes. Flip it and brush with oil or butter. 

Step 7

Once done, dish out the kebab and sprinkle the butter and cream dressing and enjoy it with lemon wedges and mint chutney.

Tip

One can pan fry the chicken by adding little oil in the pan and cooking on medium flame for about 10 to 15 minutes or until the kebab is tender and charred.


Chicken Sukka

Chicken sukka is a Maharashtrian style dry chicken recipe that is a treat for spice loving people. In my growing up years the one and only recipe we knew about with coconut was the nariyal barfi. It was only after I moved to Mumbai that I realised that coconut was one of the key ingredients for the base of any gravy and now I enjoy exploring new recipes with this incredible ingredient. Coconut not only gives texture to a dish but also adds nutty flavour to it. Chicken sukka is cooked with aromatic spices along with coconut that gives it a distinct flavour. It is a semi dry dish that can be served both as a starter or even as a main course.

Ingredients

Chicken : 500 gms

Ginger garlic paste : 2 tsp

Onion : 2

Turmeric powder : 1 tsp

Oil : 2 tsp

Salt as per taste

For the wet masala

coconut : ½ cup

Red chilli : 6

Coriander seed : 2 tsp

Cumin seed : 2 tsp

Peppercorns : 6

Cinnamon : 1

Clove : 2

Green cardamom : 2

Black cardamom : 1

Sesame seeds : 1 tsp

Poppy seed : 1 tsp

Step 1

Dry roast all the above mentioned ingredients except the dry coconut . Once done, let it cool.

Step 2

In the same pan dry roast the grated coconut until it releases the aroma.

Step 3

Grind the coconut and roasted masala into a paste.

Step 4

Marinate the chicken with ginger garlic paste, turmeric powder, salt and a tsp of ground masala. Keep it aside for at Least half an hour.

Step 5

Heat oil in a wok and add the sliced onion. Fry until golden brown.

Step 6

Add the marinated chicken and cook on a high heat for 8 to 10 minutes stirring occasionally.

Step 7


Add a cup of water and let it come to a boil. Next, put the ground masala and give them all a good mix. Cover and let it cook on medium flame for about 20 minutes stirring occasionally.

Step 8

Once the chicken is tender and moisture evaporates and you get desired consistency, it is done.

Step 9

Garnish and enjoy the chicken sukka with any Indian bread of your choice.

Tip

Dry coconut gives an authentic flavour to the chicken sukka